Makeup Exploration


Practical


I sculpted a brow piece onto a generic plastic head, in order to experiment with the fibre glass mould process.
My design conisted of a heavy brow with an human bone structure on the forehead. I also included some deep lines to help add some shape to the piece. I just made up the design and feel that it could have been more detailed and structured if I had some research behind the idea.
Overall I was happy with the sculpt and thought as it did not extend around the head to much it would more likely fit someone face better.
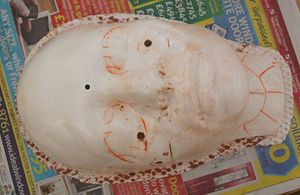
Next i had to add the flashing, where i included semi-circles around the edges rather than holes (as done in my last project). I found that this saved time and also kept the flashing clay more even and precise.
Next step was to fibre glass the piece.
-
First the Gel Coat
-
Then i added some thickened Gel coat to the undercut areas around the eyes and also in the semi-circle cuts in the flashing.
-
Fibreglass matting was then applied all over to create about 4 layers.
-
Finally a layer was added to make the mould more smooth.
-
Once dry, I was able to drill 6mm holes into the semi-circle areas in the flashing - this will allow the mould and head to stay secure and in the right position when I cast material inside.
-
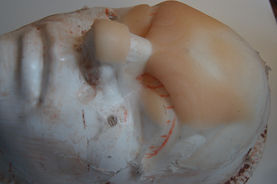
I drilled a 4mm hole in the centre where the sculpt was the thickest so that material can be injected.
-
I found that the fibreglass had gone under the edges of the plastic face and therefore i could not part it. So i had to use a VibroSaw that cut away the fibre glass and neatened up the edges.
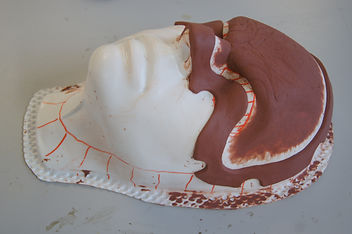
Gel coat.
Thick Gel Coat.
Fibre Glass matting
Smoothing layer
Cut with Vibrosaw, sanded and bolted.
-
Next was to part the pieces and clean out the clay from the inside.
-
Then buff the inside of the fibre glass with mould release wax and then spray a fine layer of mould release spray (polywax).
-
Then layers of cap plastic is required on the inside of the fibre glass and also on the plastic head to incapsulate the silicone once it is poured in. The same ratio of 3:1 ipa to cap plastic is needed and i put 4 good layers on each piece making sure it was fully covered.
-
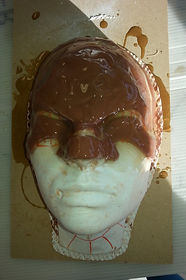
Once the layers had been completed and dried, i bolted them back together but no too tightly otherwise it could cause tried gas.
-
Next I was able to weigh out my silicone i did 20 A 20 B and 40 C with skin pigment and red flocking.
-
Then using syringes, injected the silicone into the middle hole in the back of the head.
-
Once full I left it to dry and the syringe still positioned in the whole so the silicone couldnt escape.
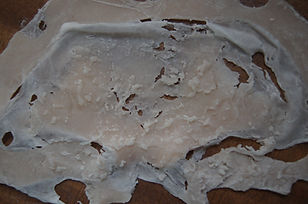
Here shows the final outcome of the silicone piece, unfortunatly i did not inject enough silicone and therefore the edges were not thin and there was no flashing. However i was able to see that the detail came out alot better than my previous mould using plaster (in the last project). This is due to the Gel coat being able to pick up the details and the fibreglass mould to be more rigid than plaster. However when i tried to remove the piece it was stuck to the plastic head and the cap plastic kept ripping and the piece fell apart. This is most likely due to either i did not apply enough mould rease or the cap plastic was to thin to withhold the pulling.I will have another go at casting the brow piece with silicone and take these suggestions into account.
Here shows my second go at casting silicone into my mould. I made sure that i weighed out enough silicone and injected it again. This time i had the bolts facing outwards, this made it easier to tighten them once the silicone had been added and also gave balance to the mould.
When the piece was ready I parted it from the Fibreglass mould, there was enough silicone to cover the whole sculpt this time. However there were some brush hairs from where I had applied the cap plastic, which meant that i had to carefully tweaser them out. Also i decided instead of leaving the syringe in the whole i blocked it up with some clay however i must of pushed it in too far as it went through into the silicone - as shown in the images.
Apart from that i was happy with the overall shape and the edges were very thin, which will make it less visible when applied to the face.
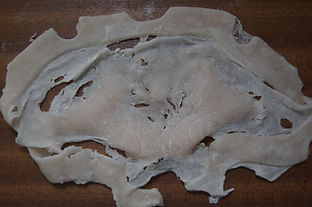
When trying to remove the piece from the plastic head, the cap plastic was stuck to it and just ripped and folded up. Unfortunately this meant that I was unable to apply it as it would not sit properly onto the face and there was no edges to blend into the skin as they were all covered in silicone.
I keep having a few problems with the cap plastic, and when i remove any silicone flat pieces from the skin, a layer of cap plastic remains and it would detach from the skin. Either something is wrong with the cap plastic or the pros-aide glue.
Gelatine
I also decided to cast the brow piece in gelatine to see how this material responds to the fibreglass mould.
Heating up the gelatine and pouring it into the negative mould then pushing the face cast into it with pressure until it cools and sets.
As you can see in the images, the gelatine picked up all the detail and shape. The edges were
The gelatine piece was much heavier and more dense than the silicone cast. I feel that this would cause the wearer to sweat more, resulting with it being more uncomfortable and also more likely to move and disintegrate. For photoshoots or in performances where is is only worn for a short time, gelatine would be a practical material to use as is quicker to cast than silicone.


6mm holes drilled into fibreglass