Makeup Exploration
Fiberglass is a strong lightweight material and is used to reinforce many products. Although it is not as strong and stiff as composites based on carbon fibre, it is less brittle, and its raw materials are much cheaper. Applications of fiberglass include,
-
Aircraft Boats
-
Automobiles
-
Bath tubs and enclosures
-
Septic tanks
-
Water tanks
-
Roofing
-
Mould making
Health and safety
Fiberglass will irritate the eyes, skin, and the respiratory system. Symptoms can include irritation of eyes, skin, nose, throat, breathing difficulty; sore throat, hoarseness and cough. Scientific evidence demonstrates that fiber glass is safe to manufacture, install and use when recommended work practices are followed to reduce temporary mechanical irritation.
Respirators
Disposable - approx. £20 and lasts about a month
Reusable – approx. £30 and lasts about 6 months – just need to replacement filters – the black stripe
Full face – filters are on the belt
Hand protection
Latex isn’t very good for polyester resin as break down – Nitrile ones is best
Eye protection
Always wear googles when working with fibreglass as will cause alot of harm if has contact with the eyes
Protective clothing
Not necessity but ideally wear loose clothing as if materials spills onto yourself then you will be able to pull clothing away from the skin.
GRP materials
Glass matting – Its strips of glass heated to a high temperature then pulled quickly, and bound together by starch. It doesnt have any liner strength. It comes in many forms, such as;
-
Loose chopped strands
-
Woven matting – like a woven fabric, more used in industrial as they have a higher strength.
-
Fine surface tissue/ vale - Act as a finishing layer to cover up the coarse glass pattern.
-
Fibreglass tape and rope - made from high temperature texturized fiberglass yarn with low thermal conductivity. Used when narrow strips of reinforcement is required.
Resin - When producing GRP moulds, unsaturated polyester resings are used. By being unsaturated this means that the resin is capable of being cured from a liquid to a solid state by using a catalyst. There are many different types of these resins, all containing different characterists, which range from strong, hard solids or to more flexible materials when cured.
-
Gel coat resin – Is the smooth, hard polyester surface coating of a fibreglass structure. The resin comes pre coloured and will change colour once catalysis is added. Creates a smooth finish and pick up all the texture but Its brittle without being reinforced.
-
Lay-up resin – It's a Polyester resin, within the group of synthetic resins, that undergoes polymerization during curing. It has excellent adhesive properties, high strength, good chemical resistance. Fiberglass resin contains styrene, which reacts with the glass fibres in the fiberglass mat, cloth and tissue, softening it so that it is easy to shape and mold around forms.
Other resins may be used for particular work, such as; better resistance to chemicals (furance resin), heat (silicone resins) or to help pick up more detail (epoxy resin).
Catalyst – Methyl Ethyl Ketone Peroxide (MEKP), Organic Peroxide. Added to the Gel coat and Lay-up resin to make it cure. It's very corrosive so be careful when using. Other catalysts that can be used are Cyclohexanone-peroxide, which is less reactive but more stable and comes in a paste form. Benzole-peroxide, is very reactive like the MEKP but comes in either a paste or powder form.
Fillers - Can be added to liquid resin to provide more thickness. Fibrous fillers, such as chopped glass fibre, can improve the strength or more simply industrial talcom powder can be used.
Polishes and release agents - Carnauba wax is the best polish to use. Be careful of ingredients as it can effect the setting of the gel coat for example Silicone waxes can inhibit the gel coat and also release agents will not dry over a silicone surface.
Within GRP, polyvinyl alcohol is widely used as its easy to apply, can be diluted and coloured. However it has a low viscosity so will drain off vertical surfaces and is used over non-pourous mould surfaces. Candle wax is very useful when covering undercuts.
Pigments - Pigment can be added throughout the process but usually is used with the gel coat. It used comes in paste forms in many colours. However it can affect the gel time of the resin, black and blue will increase it while others may shorten it.
Advantages and disadvantages?
It lasts a long time, it can be coloured, shiny or dull. It is low maintenance, anti-magnetic, fire resistant and weatherproof. The materials are reasonably inexpensive and durable allowing it to make many castings from. It can be used as a mold material for baking foam latex and takes less time than a plaster mold. It’s very lightweight and tough, making it easier to handle.
Fillers can be used to add strength and longevity. Adding cab-o-sil to the laminating resin will make it thicker. By adding chopped fibres to the laminating resin will make it stronger. Metallic powders can also be added as fillers. They make a material stronger but also heavier, it adds weight proportionally by volume and will also tint the material to the metallic colour.
Fibre glass is not that flexible, so it’s important to make sure that there isn’t any undercuts, otherwise it could break the mold when paring apart. It needs to be bolted as although the mold will be strong and stiff, it will be thin and especially on a larger mold there will be flexibility. So by bolting the pieces together around the mold flange, the flexibility is reduced and the mold becomes more firm and holds it shape better when casting. This means that the dividing wall needs to be bigger than making a plaster mold, as its important to create a fibreglass flange wide enough for you to bolt the two sections of the mold together and the clay wall will need to be wide aswell.
Using Fibreglass (GRO) (Glass Reinforced Plaster)
About
Making Fibreglass Mold Demonstration
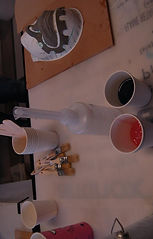
1. Make sure everything is prepared before starting
-
Resins are weighed
-
mix cups, sticks and brushes
-
clean board
-
Acetone to clean brush
-
Talcom powder
-
Board to fibre glass onto
-
Mould release
-
Matting aready ripped into pieces (2 layers over the whole piece and then a 3rd layer over the edges)
-
Cataysis
-
health and safety applied
2. Apply a visable plastic cover with release agent all over including the plastic.
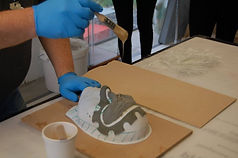
3. Mix the Gel coat (here 80g was used) with 2% catalyst (4g) - but measure up an extre .5g of catalyst as some stays in the measurer. Mix well so that the colour is even and apply at a height to get into all the detail and brush over evenly. Make sure that the layer is reasonably thick and covers the flashing and over onto the facecast.
4. Wash the brush in acetone then mix up the lay up resin with 2% catalyst and leave to cure (approx 30 mins)
5. If there are some undercuts create a filler from talcom powder and catalysied lay up resin to make a reasonably thick gloopy mixture but be careful as if its too thick it will pull up the Gel coat. Can also go over touch downs aswell to get rid of airbubbles.


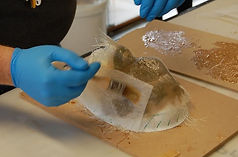
6. 'Wet Up', paint over the matting with to allow it to bend. Overlap it over the sculpt making sure its all covered. Use a brush, dipped in resin, and push the matting into the cast then paint over the top to get the fibres to move and bond together and push any airbubbles out. Do the same for the 2nd and 3rd layers.

Prep for fibre glassing
Applying the Gel coat
Filler mixture and applied onto the mold
Appling the matting
7. Apply Fine surface tissue (1 layer) to smooth over the matting.
8. Will cure within 1 1/2 hours approx but full curing can be a few weeks.
9. Once cured cut edges of the flashing with plaster tool and sand down

Finished mould with fine tissue ontop of the matting
I found that the demonstration was very thorough and included alot of information, however I decided to also look into some books and videos so that i felt more confident when producing my own fibreglass mould.
Stuart Bray. (2012).Using Fibreglass Part 3.[online].Available from: https://www.youtube.com/watch?v=5SkHwL7EIN4[Accessed 08 January 2014]
Here in these video's by Stuart Bray you can see the process of fibreglassing, however he uses the loosely chopped matting over the Gel coat to add strength before the lay up resin, it still is the same process. Its on a much larger scale than demonstrated but will be helpful when creating my work in the future. I found out how important it is to have a precise wall and grounding to improve the quality of the mould. Part 2 involved the front of the cast but showing how to master mould so that the face mould can be made in different materials ready for sculpting, which may be helpful later in my projects. The Part 3 of fibreglassing shows how to remove and clean out the mould and how to add the bolts into the flange. It also goes onto showing silicone being injected inside, which will help with my research when using foam latex in my next lessons. The videos show me why each stage in detail and well explained to why it is neccessary part to create a prosthetic piece.
Stuart Bray. (2012).Using Fibreglass Part 1.[online].Available from: https://www.youtube.com/watch?v=gMOvEnjvaZg [Accessed 08 January 2014]