Makeup Exploration
Health and Safety
-
wear gloves and respirator ( with AB1p2-type cartidges) and Goggles.
-
No drinks, food or smoking around the foam.
-
The latex will ruin clothes so wear overalls.
-
Work in a well-ventilated area but make sure there is no draughts, as any sudden change of temperature will ruin the mixture.
-
When disposing any remaining foam, allow it to set and get rid off is in a sensible environment. Do not pour down the sink as will block the pipes.
Shelf life
The latex base will go off first due to the amount of ammonia included. Even in an air tight container the ammonia will still evaporate. The shelf life is 6 to 12 months at a push. The other chemicals will most likely last 6 months. To increase the life, shake each container for a few minutes, every couple of weeks, to avoid the products from separating. Make sure that the kit is stored out of sunlight or cold temperatures, off the ground and in a dry place.
Moulds
-
Plaster/gypsum or any porous materials but are often heavy and fragile. The mould need to be cooled down before it can be removed from the oven as a sudden temperature difference could damage of ruin it.
-
Synthetic plaster moulds are heavier but sturdier as the water is replaced by resin.
-
Fiberglass moulds are much lighter and stronger. They are non porous and but require bleeder holes to allow the steam to escape as the foam is baked.
-
Epoxy resin moulds, are even harder but need to be baked all day, at increasing temperature, until reaching 130C.
-
Polyurethane resin moulds are light and strong and withstand heat better.
-
Silicone moulds and jacket silicone moulds are non – porous but you can not drill in bleeder holes, so the foam needs to be pulled away from the silicone when baking to allow the steam to escape.
Bleeder holes and Flashing
-
Bleeder holes allow you to visually control how much material is required within the mould, allows trapped gas to escape and levels the pressure up inside the mould, which reduces shrinkage. Usually the bleeder holes are drilled from the inside of the mould as it makes them easier to clean and access rather than them being in the positive mould.
-
Flashing, is a thick layer of clay or other material around the prosthetic, which allows the creation of thinner edges and levels out the pressure inside and allows excess material to escape.
Foam latex vs Silicone
You can’t use silicone in a mould that has previously had latex it but you can use latex in a mould that has previously had silicone in. As the latex will stop the silicone from curing.
foam latex is time and temperature sensitive, and can shrink.
As foam is more delicate it rarely survives removal from the actor.
Foam latex is light and good material for big suits, animatronic puppets etc. But it requires a lot of equipement; oven, mixer, injection syringe, extraction fans, respirator, scales etc.
The finished piece is opaque, and does not create translucentcy like silicone or gelatine, so needs to be can be painted with numerous layers to resemble a translucent appearance.
Silicone is heavier but does not need as much equipment. But it is advised to have a vacuum pump or degassing champer to allow a gas free silicone.
Foam latex is more comfortable for the wearer, as silicone does not breathe so the actor will perspire alot underneath.
Pigments
Special latex pigments are available and are very concentrated. However others can be used, the cheapest including food colouring powder or liquids. Acrylic paints also work but some pigments, such as red, may have negative results. Liquitex acrylic is best to use as already contains latex. Gouache paints and oil paints are not compatible with latex.
Do not add more than 10% of the amount of latex base. It can be added at the beginning or when pouring in the gelling agent.
Reinforcement
When making smaller prosthetics there is no need for reinforcement, but larger pieces such as suits or animatronic puppets need it to allow them to last longer. To reinforce them a piece of fabric is glued onto the core before the mould is put back together.
Power netting – comes in several thickness and can be stretched in multiple directions.
Lycra fabric – a lycra or leotard can be used when creating a fat suit
Tights or fishnet fabric – that withstands the heat of the oven without melting or catching fire.
Other additives
Along with reinforcement, other products can be used to change the chemical properties of the foam, for example, so the foam can be made in colder temperature, allow it to flow better inside a mold, make it really soft or more resistant.
-
Stabilizer (potassium Oleate) – allows foam to rise in low temps, add 5% to 10% to amount of latex base.
-
Flow Enhancer – flows better within the mould and makes injecting easier
-
Super Cell foaming Agent – to create a superfine foam, can be used to mend or conceal a seam
-
Zinc Oxyde – makes the foam abit tougher
-
Creamed latex – makes it harder to touch. Brush a few layers on the negative mould, let it dry and inject the mould.
-
Liquid latex – to create a layer of semi-rigid looking material onto of the foam latex. Has a different appearance to foam latex. Good for armours or helmets.
-
electonic scale
-
multiple-speed Mixer with whisk attachment and a big bowl
-
Oven designed for baking foam latex
-
Thermometer
-
Stop-watch
-
Notepad/working sheet
-
Disposable cups for the gelling agent
-
Gloves, respirator, goggles, overalls etc
-
Cheap disposable brushes (1/2 inch) and injection gun
Determining amount of latex
Half a mask (cheekbones and forehead) – take less than 200g of latex base
Full mask – could use up to 1000g
The best way it to keep the clay or material used to sculpt the prosthetic. Place it in a bag and then in the bowl of the mixer. Pour in the mature so that it is level with the material and that should be roughly how much is required. Keep in mind that when the latex is mixed it can expand by 3 or 4 times the volume.
The typica batch of foam latex consists of 150g of high-grade latex base, 30g of foaming agent,, 15g of curing agent and 14 g of gelling agent. ideal conditions would be room temp 20.5-22c with 45-55% humidity. So aspects need to be altered if these are different at your location.
Applying material
-
Manually – This works for smaller moulds. Mould is laying open and brush the thin layer of foam first, to get the detail, then add more foam on top being careful not to trap air bubbles. Then press the core or positive mould into the foam and allow the excess foam to pour out the sides. Keep pressure on the mould to keep thin edges.
-
Injection – With an injection syringe, inject foam in a closed mould, until the foam comes out of the bleeder holes or through the flashing. Plug up the holes using clay. Also hold at 45 angle while being filled.
-
If the mould is very big and it is not possible to run all the foam at once, both these methods can be used. Starting by brushing in a thin layer of foam, et it set and part-bake (approx. 1 hour). Then apply another layer and repeat. Keep repeating as many times as necessary then but the mould together and inject the rest of the foam. But make sure when it is baked at a lower temperature, for a longer time, so that the first layer does not overcook.
About
Making


Instructions
-
Weigh out materials into the bowl. First latex base, then foaming agent (20%), curing agent (10%), and then colouring.
-
Apply mould realease so that they are ready for the foam.
-
Whisk for 1 minute on low speed
-
Whisk at a high speed to give volume (4 minutes)
-
Measure out gelling agent
-
Turn whish speed down to refine the foam and remove air bubbles. (10 – 20 minutes depending on the mix)
-
Once the whisk creates a ‘Donut’ shape on the surface of the mix, add the gelling agent – over 30 seconds all over the mix. Do not apply inside the whisk as it doesn’t mix as well n this area and also use a spatula to scrap the inside of the bowl and bring mixture to the center.
-
Leave to mix for 1 ½ minutes
-
Then fill up the mould (10 – 30 minutes handling time)
-
Once filled, let the foam gel set before it is put into the oven. (20/30 minutes – test excess foam, make sure there is no liquid in the foam)
-
Once set but in the oven at temperature 85-89C. The thickest part of the mould determines the time required. If the mould is made from plaster, polyurethane resin or jacket silicone, it roughly takes 1hour per cm of mould thickness. Ig made from fiberglass. Polyester or epoxy resin. It takes 1-hour baking time per mm of mould thickness. Make sure oven is in a well ventilated area as the foam being baked will produce smell.
-
If the foam looks grey or brownish it means it has been overcooked. Making the foam weaker but can still be used, steam the piece to remove the colour. The foam should spring back to its shape once cooked through.
Demould
If the mould is made from plaster/mineral material, it needs to cool down before being removed from the oven. As shock in temperature difference can cause it to crack. Just turn of the oven and leave it for about 1 hour or until temp is close to room temp. if made from resin/fiberglass it can be taken out straight away but be careful as it will be hot. Use talcum powder to help part the moulds.
Clean
The piece can not be used straight away as it is full of chemicals. It needs to be washed in several baths of warm soapy water, until the water runs clear. Then bath it in plain water, Let it dry gently ideally on its mould.
Mending/smoothing seams
Mix up some foam but allow it to rise a little more, refine it as before but do not add the gelling agent. The foam can be kept in the fridge for a few hours. Add the gelling agent when you need it. Once the foam has set either apply to the skin (to help blend edges) or to correct seams and put it back in the oven for a little while. If repairing an area where there is little movement, bondo can be used instead (Pros-aide and Fumed silica). It does not need to be baked but does produce a tougher line.
Colouring
First the foam needs to be sealed, or the colour will be uneven. Use pros-aide to seal the piece and then powder it.
-
RMGP Rubber Mask Grease Paint can be used, build up layers of colour to make it look more natural and always powder.
-
Alcohol activated paint – very translucent, avoid eye areas.
-
Pax paint – Acrylic and prosaise (50/50 but it can be made thicker or runnier if needed) Liquitex paint is best to use as latex sticks to latex. Also there is no need to seal the latex when using Pax paint but still use powder to set each layer.
-
Airbrush – make sure paint is suitable for latex
Hair
Foam is easy to punch hair through. Use a specially designed needle or a home-made one and glue the ends of the hair to help secure it in place. Powder. Hair can also be glues to the outside of the piece.
Foam lates is a creamed latex, that main component is foam latex.
-
The foaming agent a thick liquid, made from castor oil and water, and is applied 20% to the amount of latex. Bonds as a soap that bonds to the cells of the latex, lowering the surface tension and allowing it to froth more easily.
-
Curing agent is a sulphur-based liquid of a yellowish colour. It gives the foam elasticity, which allows it to return to its orginal shape when pressed. 10% is applied to the amount of latex base.
-
Gelling Agent is a grey liquid, that helps set the foam from a liquid to a solid. The amount depends on different factors including; temperature, humidity, the refining time. It is usually is between 10% and 14% of the latex base, but can be less if room temp is higher than 20C or more if under than 20C.
-
Release Agent of Zinc Stearate. Brushed on any porous material such as plaster. I leaves a residue on the mould that needs to be brushed out before casting. Can be used on fibre glass moulds when they are damaged as the foam can secure in cracks.


Here show Giles pouring the foam latex into a syringe, then applying it into a mould. As shown in the images the foam is easier seen when it escapes the bleeder holes, which allows a visual indication in if there is enough foam. It shows how the holes have been blocked by clay. From here it was then put into the oven to bake.
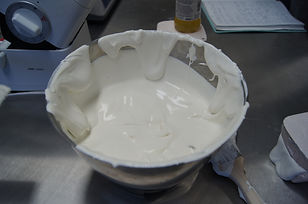
Here shows the foam when it was created. I can refer back to this image when producing my own foam to make sure it is similair in texture
Examples produced by Giles
Here shows some of the pieces that Giles ran foam latex for, the left image shows a wolfverine hand and then a demond and an alien from doctor who. The photographs all show how much detail the foam latex has picked up from the moulds and there do not seem to be any defects. It also gives me some examples to look at when creating my own work to where bleeder holes and flashing should be included. I was very suprised to how lifelike the painted foam can appear for the fact that it is not translucent. This shows that by having a good paint job can make any material look like skin/flesh.